Generic Aliexpress BK7231N CB2S plug connection to homeassistant
I hate it when so called "smart" devices require proprietary application and they differ from vendor to vendor. This is not only cumbersome, but also unsustainable as the provider could stop supporting the cloud service (or app) and make the device obsolete. This is why I use homeassistant, open protocols and open firmware whenever possible.
Last Christmas I got tired of plugging the lights every day and since I'm lazy like that, I decided to get few "smart" plugs and automate it. So far I've only had one device for balcony lights, turning them on right before sunset and off at 2AM, and it has worked worked flawlessly. It's a bit bulky and requires to cut the cord (Sonoff Mini) and I don't want to cut all my Christmas lights.
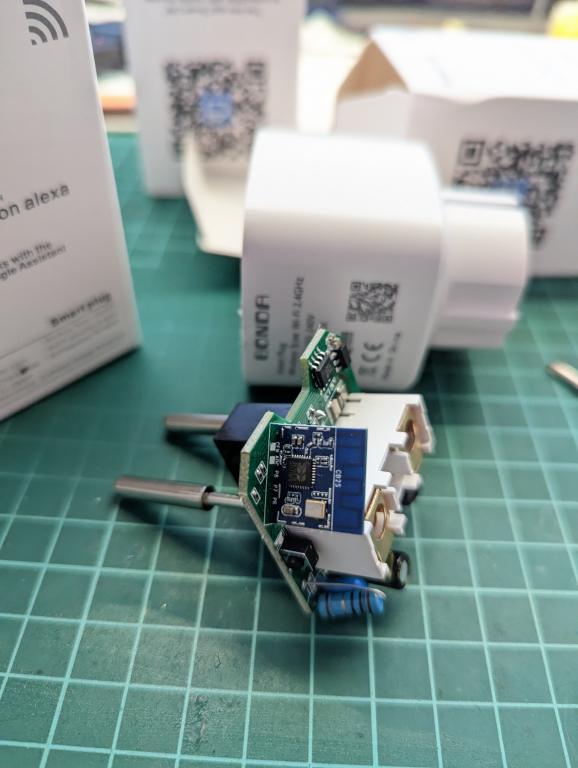
Instead, I got one of the cheapest smart plugs off Aliexpress, one that claims it also reports power usage stats, so I was hopeful it would actually have the required hardware and would probably be flash-able too. It came in an absolute noname packaging, lol, apart from some non-descriptive ID on the device (that I was unable to google-find anywhere). I just pried the plug open, checked out micro controller labels and googled for flashing options. I tried to flash it via FTDI cable, but it turned out it's not required at all, it was sufficient to just use a modding script that exploits device via native API and uploads custom firmware. When I finally got the device into homeassistant and it did all I needed it to do, I got 4 more plugs. Of course, they were slightly different, lol, even though I bought exactly the same device, but I checked it and all of them have the same internals, and flashing instructions worked for them too (success emoji).
Here's how I did it, in case someone finds this useful (hence post in English):
1. Download the Tuya Cloudcutter, tool that exploits Tuya (more or less all those no name devices have the same manufacturer) API and uploads custom firmware.
- `git clone git@github.com:tuya-cloudcutter/tuya-cloudcutter.git`;
- change directory to tuya-cloudcutter. `cd tuya-cloudcutter`
2. Run cloudcutter. The profile and 3rd party firmware that works for me is "aubess-20a-plug" and "OpenBK7231N".
- "aubess-20a-plug" seemed like the closest device from available list since plug has "BK7231N, CB2S" chipset.
- OpenBK7231N seems like a good project that works with homeassistant and it works for me well enough. Download the BK7231N "CCtr Flash" (Tuya cloud Cutter flash) image from https://github.com/openshwprojects/OpenBK7231T_App/releases/ and save to `tuya-cloudcutter/custom-firmware` directory.
3. Cloudcutter process is a bit tedious, but here are the main steps:
- Run CLI command: `./tuya-cloudcutter.sh -p aubess-20a-plug -f OpenBK7231N_UG_1.15.568.bin`
- Plug device in the outlet, press and hold power button until it starts fast blinking (takes ~6 seconds). Release the button.
- While You're preparing device, terminal should print "Scanning for open Tuya SmartLife AP ....".
- Then press the button again and wait till it turns off and back on, keep it pressed until it slow blinks.
- At this point computer should have asked for admin password. provide it. Script should have found device and ran the exploit.
- If everything is correct, it will ask You to power cycle the device (unplug and plug it back in), press the button again until You get into fast blinking mode, then press button again until You are into slow blinking mode.
- Meanwhile it might ask for computer password again, should have searched for device again and hopefully found it. If You fail at any point, You can just kill and rerun the script, follow instructions from top.
- At this point it will print "wlp3s0: AP-ENABLED" and it will seem like it's doing nothing, but You just have to wait (the message in script states this too). Should take couple minutes.
- Follow the script output, it will upload custom firmware to device and eventually the script will stop.
Here's the script output example:
---
./tuya-cloudcutter.sh -p aubess-20a-plug -f OpenBK7231N_UG_1.15.568.bin
Building cloudcutter docker image
[+] Building 0.8s (13/13) FINISHED
=> [internal] load build definition from Dockerfile 0.0s
=> => transferring dockerfile: 457B 0.0s
=> [internal] load .dockerignore 0.0s
=> => transferring context: 2B 0.0s
=> [internal] load metadata for docker.io/library/python:3.9-slim-buster 0.7s
=> [base 1/2] FROM docker.io/library/python:3.9-slim-buster@sha256:0ac1e4889c90d3117680b33cbdd397e3d95098b4c6bcff8600035fa5343527ed 0.0s
=> [internal] load build context 0.0s
=> => transferring context: 3.02kB 0.0s
=> CACHED [base 2/2] RUN apt-get -qq update && apt-get install -qy --no-install-recommends git hostapd rfkill dnsmasq build-essential 0.0s
=> CACHED [python-deps 1/4] RUN pip install --upgrade pipenv 0.0s
=> CACHED [python-deps 2/4] COPY src/Pipfile /src/ 0.0s
=> CACHED [python-deps 3/4] COPY src/Pipfile.lock /src/ 0.0s
=> CACHED [python-deps 4/4] RUN cd /src && PIPENV_VENV_IN_PROJECT=1 pipenv install --deploy 0.0s
=> CACHED [cloudcutter 1/2] COPY src /src 0.0s
=> CACHED [cloudcutter 2/2] WORKDIR /src 0.0s
=> exporting to image 0.0s
=> => exporting layers 0.0s
=> => writing image sha256:45a89131482305a949b89cf4f654f02929434595d8af43ea140f6da17297b6f7 0.0s
=> => naming to docker.io/library/cloudcutter 0.0s
Successfully built docker image
Loading options, please wait...
Selected Device Slug: aubess-20a-plug
Selected Profile: oem-bk7231n-plug-1.1.8-sdk-2.3.1-40.00
Selected Firmware: OpenBK7231N_UG_1.15.568.bin================================================================================
Place your device in AP (slow blink) mode. This can usually be accomplished by either:
Power cycling off/on - 3 times and wait for the device to fast-blink, then repeat 3 more times. Some devices need 4 or 5 times on each side of the pause
Long press the power/reset button on the device until it starts fast-blinking, then releasing, and then holding the power/reset button again until the device starts slow-blinking.
See https://support.tuya.com/en/help/_detail/K9hut3w10nby8 for more information.
================================================================================Scanning for open Tuya SmartLife AP
.....
Found access point name: "A-D249", trying to connect...
Device 'wlp3s0' successfully activated with '7ab98544-c999-4296-9e88-deb255a4688a'.
Connected to access point.
Waiting 1 sec to allow device to set itself up...
Running initial exploit toolchain...
Exploit run, saved device config too!
output=/work/configured-devices/7G5qbfD5YUr6.deviceconfig
Saved device config in /work/configured-devices/7G5qbfD5YUr6.deviceconfig================================================================================
Power cycle and place your device in AP (slow blink) mode again. This can usually be accomplished by either:
Power cycling off/on - 3 times and wait for the device to fast-blink, then repeat 3 more times. Some devices need 4 or 5 times on each side of the pause
Long press the power/reset button on the device until it starts fast-blinking, then releasing, and then holding the power/reset button again until the device starts slow-blinking.
See https://support.tuya.com/en/help/_detail/K9hut3w10nby8 for more information.
================================================================================Scanning for open Tuya SmartLife AP
..........
Found access point name: "A-D249", trying to connect...
Device 'wlp3s0' successfully activated with '7ab98544-c999-4296-9e88-deb255a4688a'.
Connected to access point.
Configured device to connect to 'cloudcutterflash'
Device is connecting to 'cloudcutterflash' access point. Passphrase for the AP is 'abcdabcd' (without ')
Checking UDP port 53... Occupied by systemd-resolve with PID 61627.
Port 53 is needed to resolve DNS queries
Do you wish to terminate systemd-resolve? [y/N] y
Attempting to stop systemd-resolved.service
Checking UDP port 67... Available.
Checking TCP port 80... Available.
Checking TCP port 443... Available.
Checking TCP port 1883... Available.
Checking TCP port 8886... Available.
Flashing custom firmware...================================================================================
Wait for up to 10-120 seconds for the device to connect to 'cloudcutterflash'. This script will then show the firmware upgrade requests sent by the device.
================================================================================Using WLAN adapter: wlp3s0
Configuration file: /dev/stdin
Using interface wlp3s0 with hwaddr 08:8e:90:fb:ae:be and ssid "cloudcutterflash"
wlp3s0: interface state UNINITIALIZED->ENABLED
wlp3s0: AP-ENABLED
Using PSK v1 - Received PSK ID version 01
Processing endpoint /v2/url_config
Processing endpoint tuya.device.active
Processing endpoint tuya.device.dynamic.config.get
Processing endpoint tuya.device.property.save
!!! Endpoint response not found, using default response - tuya.device.property.save (This is usually okay and safe to ignore unless something isn't working)
Processing endpoint tuya.device.uuid.pskkey.get
[MQTT Sending] Triggering firmware update message.
Processing endpoint tuya.device.upgrade.get
Processing endpoint tuya.device.upgrade.status.update
Processing endpoint /files/OpenBK7231N_UG_1.15.568.bin
Firmware update progress: 7%
Firmware update progress: 13%
Firmware update progress: 17%
Firmware update progress: 47%
Firmware update progress: 72%
Processing endpoint tuya.device.upgrade.silent.get
Processing endpoint atop.online.debug.log
Firmware update progress: 85%
Processing endpoint tuya.device.dynamic.config.get
Processing endpoint tuya.device.dynamic.config.ack
Processing endpoint tuya.device.timer.count
Firmware update progress: 91%
[Firmware Upload] /files/OpenBK7231N_UG_1.15.568.bin send complete, request range: bytes=0-621375/621376
Firmware update progress: 94%
Firmware update progress: 98%
Firmware file has been sent and MQTT reported a progress of nearly complete. Waiting 15 seconds to ensure flashing completes.
Flashing should be complete. It takes about 15 seconds for the device to reboot and verify the flash was valid.
Please wait about 30 seconds then look for signs of activity from the firmware you supplied (either watch for AP mode or check if it joined your network).
Device MAC address: 1c:90:ff:b1:d2:49
---
4. The device will come up shortly, you can find it with wlan scanner:
---
Cell 03 - Address: 1C:90:FF:B1:D2:48
Channel:1
Frequency:2.412 GHz (Channel 1)
ESSID:"OpenBK7231N_FFB1D249"
---
5. Connect to wifi, initial device ip (url) is http://192.168.4.1. I had to disable and enable wifi adapter for wifi networks to show up in networkmonitor applet. Configure device as follows:
- Launch Web Application to select i/o profile for plug (http://10.10.50.145/app)
- Select "Aubess Smart Plug (Aubess LSPA9 clone)" as it looks to be the closest and everything seems to work with it. Even though image says 16A, not sure if it matters. Click "Save Pins" button at the bottom of the page
- Go back to main configuration at http://192.168.4.1, configure Wifi at "Config -> Configue WiFi". Scan local networks or write connection details by hand. MAKE SURE TO ENTER CORRECT WIFI CREDENTIALS! Click "Submit", wait till it restarts and connects.
- Connect computer to network You added plug to. It should be the same network as Your MQTT service (Get the new IP address of Your plug (either from Wifi router DHCP lease list or scan network ip's). It You succeed to connect to your new device, everything still goes according to plan.
- Proceed with "Config -> Configure Names" to assign unique name to Your device. Mine is "plug1" for "ShortName" and "plug2_OpenBK7231N_FFB1D249" for "Full Name". Click submit.
- Configure MQTT at "Config -> Configure MQTT". You'll need a preconfigured MQTT instance that is connected to Homeassistant (if You don't have one, set it up first). Host should be ip of mqtt server (probably the same ip as homeassistant), my client topic is "plug1".
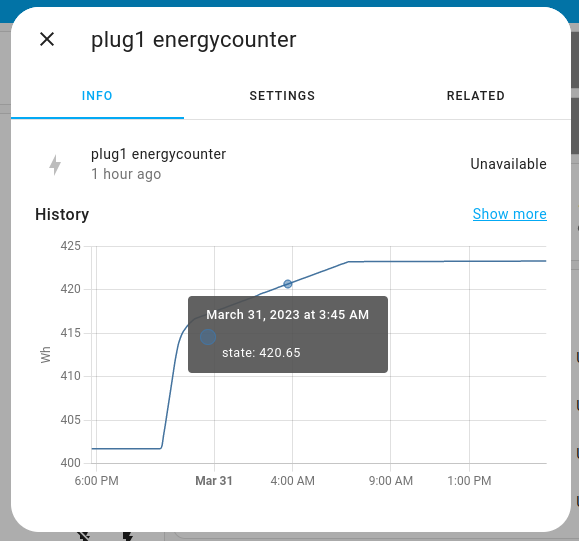
- Add device to homeassistant. Go to "Config -> Home Assistant Configuration". From here You can either manually add the printed snippet to your homeassistant configuration yaml file if You configure all devices by hand or click "Start Home Assistant Discovery". If you click the button, the plug should be discovered as new device in Your Homeassistant web UI. If it's there, the process has been successful, You should be able to see all graphs and be able to turn relay on and off.
Issues:
- I think it should be possible to toggle the relay by pressing the button on the plug, but it's not possible on my devices. I suspect pin configuration in plug's "Web Application" is incorrect or missing.
- I should check how to get the device auto power-up when plugged in. I have to turn it on via UI after i plug it in which is fine since I don't plan to unplug it too often, but also annoying. There should be a setting for it somewhere. EDIT: "Config -> Configure Startup", add "-1" to restore last state after plugging it in.
Related keywords: Bonda, BSD33, BK7231N, CB2S, Homeassistant
Problēmas risināšana IT stilā
Kā vienmēr, vāros gari, TLDR: Asterisk.
Bitei ir laba zona, teikšu ka pat labāka kā Tele2. Bet ne visur. Un ne vienmēr. Teiksim kabinetā man neiet, it kā ir, bet tā -tā. Labā lieta ir tāda, ka parunāt var, bet reāli jau neviens nerunā kabinetā (lai netraucētu kolēģiem), tapēc dodas ārā. Parasti klusākā vieta kur nolīst ofisa ēkai ir tuvāk pilsētas centram, tur arī zona ir krietni labāka, ideāla.
Tā sanācis, ka pēdējā laikā biežāk sēžu kabinetā stāvu zemāk. Tur Bitei man zonas nav pilnīgi necik, nepalīdz nekas, ne forsēts 2G, nekas. Sanāca pat tā, ka kolēģis ar LMT regulāri nāca lejā, iedot telefonu parunāt, jo klients mani nevar sazvanīt. Un ja klients nevar sazvanīt, tad tas ir slikti. Neskatoties uz to ka mūsu ofiss atrodas Valmieras baltajās zīmēs, sajūta tāda kā dzīvotu trešās pasaules valstī. Vienkārši atrodamies pilsētas nomalē un ofisa ēka laikam ir viens liels faradeja būris kas nepatīk bites viļņiem.
Skatījos tarifus, bite tomēr uzvar, tieši tarifu ziņā. Tele2 ir laikam tik pat, bet minu ka Tele2 zona ir tāds pats craps. Un es vēl ļoti ilgi atcerēšos apjājienu ar Tele2 interneta tarifiem. Ja man būtu piektā nokija, tādas problēmas nebūtu, bet jau 10 gadus tālruņiem nav ārējās antenas.
Risinājumiem bija dažādi, bet mans risinājums šai situācijai ir tāds - Tā kā Android jau no 2.3 versijas ir native VOIP atbalsts, tad izlēmu būvēt telefoncentrāli. Paņēmu mājās veco raspberry pi, piespraudu tīkla vadu un no kolēģa aizlienētu "mobilo puļķi". Iekšā ieliku Okarti, tādas mētājas no dažādiem projektiem un uzstādīju Asterisk atvērtā koda telefoncentrāli.
Protams tik vienkārši jau tas nebija, ņemot vērā, ka pieredze ar to ir ļoti ļoti minimāla (necik). Nekas tur negāja, kompilējot nekas negāja un likās ka tas ir absolūts no-go. Pat RasPBX īsti nesagāja uzreiz, bet ar laiku izdevās pielauzt un atkārtoti uzliekot vēl kādas 5 reizes, viss jau gāja pat ļoti raiti.
Sastāvdaļas - Android telefons, Raspberry Pi (der pirmais, pats senākais modelis), RasPBX, USB GSM modulis, Okarte un tīkla vads.

1. Android telefonam pievienoju savu telefoncentrāli kā SIP serveri (extension), ieslēdzu ienākošos zvanus, nodrošinot to ka centrāle mani var sasniegt jebkurā laikā.
2. Telefonam ar kodu *62* aktivizēju zvanu pāradresāciju uz sekundāro numuru laikos kad mans primārais numurs nav pieejams.
3. Centrālē USB puļķī ienākošos zvanus savienoju (trunk) ar savu centrāles numuru (extension) un zvani no sekundārā numura caur internetu nonāk pie manis. Aizmirsu pieminēt, ka (loģiski) kabinetā ir ļoti labs internets.
4. Zvanot kontaktiem, telefons ļauj izvēlēties kā vēlos zvanīt - caur primāro telefontīklu, vai SIP serveri. Tad kad nav zonas, zvanu caur SIP.
Tā kā viss patika, sākotnēji ieslēdzu arī zvanu ierakstīšanu, bet tā kā atvilnē atrastā SD karte bija veca un lēna, tad nebrīnos ka tieši tas bija iemesls tam, ka kādas pirmās 5 sekundes sarunā ir sarunas aizture uz kādām 2 sekundēm. Pēc tam viss ir kārtībā, aizturi, manuprāt, just nevar. Kad noņēmu ierakstīšanu, šāda aizture ir var būt sekundi vai divas pēc sarunas sākšanas.
Vēl viens sarežģījums radās, kad aizlienēto interneta puļķi nomainīju pret patstāvīgi, māsas doto. Abi ir huawei (chan_dongle prasība), bet otrais bija bloķēts. Pirmkārt, jānoņem SIM aizslēgu, bet pašu USB modemu var atslēgt, iegūstot kodu no IMEI numura (internetā atrodamas programmas) un ievadot to AT komandu veidā. Nesaprotu, kādēļ operatori tos vispār bloķē, jo atslēgšana aizņēma vien dažas minūtes.
Ja es pie šāda elementāra risinājuma būtu nonācis kādus 5 gadus atpakaļ, kad starp "lielākajiem" tīkliem nebija bezmaksas minūtes, varētu sev uztaisīt stipri lētākas sarunas, izmantojot vairākus puļķus un SIM karti katram tīklam. Tagad tas, protams, ir bezjēdzīgi, ja vienīgi noliek sev citu centrāli kaut kur ārzemēs, kur pašam sanāk biežāk zvanīt. Bet tam ir var ļoti ērti lietot zerozvanu.
Tā nu šoreiz esmu sadzīvisku problēmu risinājis nevis ar naudu (iegādājoties citu karti ar labāku pārklājumu), bet gan ar IT attapību ;)
Lenovo S650 Lollipop
Good news, we have working Android 5 available for our phone, Lenovo S650. Of course it's third party again, but it works, there is no bloatware (besides google chrome) preinstalled so it's all good. And we have stock settings and Google Now Launcher by default. So far it looks clean and performant, no HW issues whatsoever. EDIT: not a real lollopop :(
Lenovo S650 AOSP 4.4.2 (Kitkat) + common issues I've had installing it
Lenovo S650 is a great phone and I think it's newer brother, S660, is even better. There are only 2 real drawbacks:
- it has no built in compass (which is really really bad)
- it has very special software, VibeUI on it.
The VibeUI. It can very well be kitkat (yes, they do have official kitkat update now), but you wouldn't know that unless you look at the software version, because they have modified everything. Even settings menu is custom, I hate that. Another issue is that fishy antivirus thingy that keeps bugging me. It could run in background, but instead it's always on status bar. I hate that. I tried to escape it in any way, but there is no support, seems like everyone loves the VibeUI.
Last night I found out there is an AOSP kitkat version that actually works. So i've written a small article how I installed it on my S650, because this custom firmware is published on russian site and while i can somehow read it, i believe there are people that cannot.
First, here's a link to the forum topic that has various firmwares: http://4pda.ru/forum/index.php?showtopic=567114
IMEI backup
It's very possible that you will loose your mobile connectivity because of invalid IMEI error after flashing any firmware. You have to write down both IMEI numbers of your phone just to be safe. You have been warned. Do this first and save the numbers.
Custom recovery
You will need TWRP recovery for your phone. I got it from here: http://lenovo-forums.ru/topic/3499-lenovo-s650-%D1%80%D0%B0%D1%81%D1%88… (or here)
I had ROW version installed already because my phone was ROW.
Firmware
I chose "Google_AOSP by Zver999666", because it was latest that had all features i wanted. It's posted here: http://4pda.ru/forum/index.php?showtopic=567114&st=1380#entry35813841
There are 3 downloads: ROW version, CN version and Root that works on both. You have two options to choose from: ROW ROM or CN ROM, but you have to flash version that your current system has. I tried to run ROW, but I got stuck on a boot loop with coloured dots flying around, never finishing the boot.
ROW TO CN TWRP change
So what i did is, i changed TWRP from ROW to CN by flashing a new one and I also flashed filesystem fix rp_5.5+0.5gb-cn.zip, originally posted here, but the link didn't work so i got it from here: http://lenovo-forums.ru/index.php?app=forums&module=forums§ion=atta… .
It also comes with an instruction: you flash TWRP CN version (2.7), reboot and then flash the format.zip that has been automatically created in root of sdcard.
Then i flashed the rp_5.5+0.5gb-cn.zip mentioned earlier and it was all good now.
Flashing CN version
So yeah, I flashed the CN version, then Root pack and it just worked.
Invalid IMEI
This one has been bugging me from the very first night I got the phone and flashed it. I think i accidentally formatted the wrong partitions or something, but i had to fix IMEI. Apparently it was erased so I had to fix it somehow. IMEI1 is written on the back of the phone, I calculated another IMEI using online calculator (cannot recall which one), because you cannot just provide a random one. I used those 2 IMEI numbers and software called imei_mtk6515 (I know we have MTK6582, but it indeed works) from https://github.com/luckasfb/Fly_IQ255_Firmware_Build/tree/master/tools/…
You have to run it like this: imei.exe <15digit_IMEI_1> <15digit_IMEI_2> MP0B_001
I have linux, but the exe file still works even for me, so apparently it doesn't matter if you have windows or linux.
This command generates nvram file MP0B_001, that you have to put in /data/nvram/md/NVRAM/NVD_IMEI/ . To accomplish this, i used software called "ES File explorer" that has "Root browser" option which allows copying the MP0B_001 and putting it in location provided above.
One more thing: It didn't work for me at first, but i figured out i have to set permissions for the file, 660 (rw rw -).
Reboot the phone and you should have coverage now.
EXIF rename
Atjaunoju sen pazaudētās bildes, bet tā arī nebiju sašķirojis. Uzmontēju mazu koda gabalu, kas tās vismaz sakārto pa mapītēm.
for file in atguutaas_bildes/*jpg
do
# get date from exif
dst=$(exif -t 0x9003 -m $file | sed 's/ /-/g' | sed 's/://g')
dst_date=$(echo $dst | cut -d "-" -f 1)
dst_time=$(echo $dst | cut -d "-" -f 2)
filename="${file##*/}"
newname=$dst_date/$dst_date-$dst_time-$filename.jpg
# test for empty date
if [ -z "$dst" ]
then
newname=$(basename $file)
fi
# create folder if doesn't exist
if [ ! -d sorted/$dst_date ]
then
mkdir -p sorted/$dst_date
fi
# move pics
mv $file sorted/$newname
#echo sorted/$newname
done
Sweex LW150 firmware upgrade
Just like every other el-cheapo home wifi router i've had lately, this one (Sweex LW150) gave up too (of course only when warranty was over). Occasionally hanging up, quietly waiting for reset.
I have TPlink lying around too, but it would be too fancy, having wifi router with a USB port. So I looked for firmware upgrades, but found none, even in sweex homepage. Googled firmware I was currently on (H1_V3.2.5e) and found, as it appears, an alternative device Tenda W268R.
Why would I even think of flashing different firmware in it? Lucky guess - I found this listing and assumed W268R is rebranded LW150.
So yeah, i did flash it (not so much with fingers crossed, more with hope of getting new hardware) and it still works, just different Web-UI. Same settings, just like casual upgrade. Rebooted several times, reset to default config, reconfigured and will see how it acts during nightly data backup sessions.
TLDR: If you have Sweex LW150, you can upgrade it with firmware from Tenda W268R. Just look out for old firmware name, you gotta look out for correct prefix (H1_V3.xxx)
How to fix low mic volume issue on Cubot GT99
Cubot GT99 is cheap yet beautiful quad core android phone from yet another Chinese manufacturer. Of course there's no support or anything for it and user base is low.
I struggled with this issue where other party was unable to hear me because my mic level appeared to be really low. There is no setting to change it. First i thought that might be faulty hardware or something, but it works okay when in speaker mode so i wanted to figure it out.
Phone is based on MKT (MTK6589) chip so we'll use Mobileuncle MTK Tools to boost mic volume.
1. Download application from Play Store: Mobileuncle MTK Tools
2. Open application, navigate "Engineer Mode > Engineer Mode ( MTK )", then swipe to "Hardware Testing" tab and open "Audio > Normal Mode"
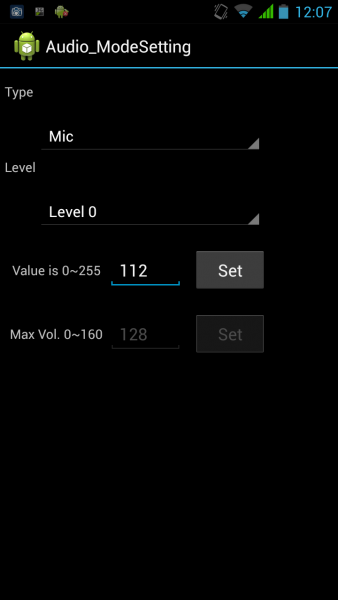
3. Watch carefully for "Type", change to "Mic".
4. Change values for Level 0 to 6 one by one and don't forget to press "Set" after each change.
Note: for even louder mic, you can set all values to 255
Level 0 - 112
Level 1 - 136
Level 2 - 160
Level 3 - 184
Level 4 - 208
Level 5 - 232
Level 6 - 255
After you've saved (Set) last setting, you may exit the application and everything should work. If you are like me and you want to see other settings too, go ahead. Just don't fiddle with them much as you can easily "break your phone" by changing wrong setting.
btw, here's the easiest way to root cubot gt99 in case you need it. works both on windows and linux - http://blog.geekbuying.com/index.php/2013/07/31/how-to-root-cubot-gt99-mtk6589-quad-core-smart-phone/
Piezīme: Šis ir vēl viens angļu valodas ieraksts samērā retai problēmai, kurai internetā neradu risinājumu un atrisināju pats.
Flash cl-osd into g-osd using usbasp S51 avr
I've had this g-osd for couple years already which lacked few features. There was very promising project coming up on rcgroups which stated that we'll be able to have better firmware for those el-cheapo OSD's.
I have no experience with chip programming whatsoever so i thought this is going to be really complicated, keeping in mind that i have ubuntu linux computer.
So i bought this cheap programmer off ebay (more permananent link from dx instead) , called "USBASP USBISP Downloader Programmer for 51 AVR". Was really cheap, like 5$ shipped.
Use picture from project site (see G-OSD pic) as a reference to solder of wires in place. Test which is correct wire and solder down connector pins.
Download subversion if you don't have any
# sudo apt-get install subversion
Download latest cl-osd code:
# svn checkout http://cl-osd.googlecode.com/svn/trunk/
Install avrdude on ubuntu, like this
# sudo apt-get install avrdude
Then change into cl-osd directory
cd trunk
Note: if you plan changing anything, this is the source. Otherwise (and i suggest doing that for the first time, just change directory that contains pre-compiled binaries.
# cd G-OSD
Connect the programmer (and the OSD device), programm chip like this:
# sudo avrdude -p m88 -c usbasp -U flash:w:cl-osd.hex -U eeprom:w:cl-osd.eep
This didn't work out for me because of some errors, so i forced the flash:
# sudo avrdude -p m88 -c usbasp -U flash:w:cl-osd.hex -U eeprom:w:cl-osd.eep -F
Then some upload progress happened and less than minute later i was ready to hook it up to video link again. And it works!
How to root Pipo M9 using Ubuntu Linux
Note: updated version of this article available on my other website, dedicated to pipo m9 device only: http://www.pipo-m9.info/
Was unable to get the windows driver working properly, so i gave Ubuntu 13.04 a shot at rooting Pipo M9 device.
We're running all commands as root, so start with "sudo su". Your prompt should start with "#" now.
1. Download usual windows rooting archive from http://www.mediafire.com/download/dzx599tkq0rdehl/RK3188_ROOT_Tool.zip (zip password is "geekbuying.com".
2. Get adb. I didn't have one, so i installed it like this:
# add-apt-repository ppa:nilarimogard/webupd8
# apt-get update
# apt-get install android-tools-adb android-tools-fastboot
3. Make sure your computer can see device. Turn on "USB Debugging", connect usb cable and see dmesg output.
# dmesg
Should return something like this:
[45441.193934] usb 2-1.3: new high-speed USB device number 12 using ehci-pci
[45441.286976] usb 2-1.3: New USB device found, idVendor=2207, idProduct=0010
[45441.286983] usb 2-1.3: New USB device strings: Mfr=2, Product=3, SerialNumber=4
[45441.286987] usb 2-1.3: Product: M9
[45441.286991] usb 2-1.3: Manufacturer: rockchip
[45441.286994] usb 2-1.3: SerialNumber: KI8VAVXFUD
4. Get the udev rolling
# sudo gedit /etc/udev/rules.d/99-android.rules
paste this text: SUBSYSTEMS=="usb", ATTRS{idVendor}=="2207", ATTRS{idProduct}=="0010", MODE="0660", OWNER="root"
# service udev restart
# udevadm control --reload-rules
# echo "0x2207" > ~/.android/adb_usb.ini
5. Hopefully adb can see device now (fingerscrossed)
# adb kill-server
# adb devices
Should return this:
List of devices attached
KI8VAVXFUD device
# cd /home/janis/Downloads/RK3188-root
Pay attention to TPSparkyRoot.bat file, you should open it in text editor and execute it line by line (following the directions in echo parts of code).
Ierakstu izdomāju uzbakstīt angliski, jo man neizdevās atrast risinājumu šai problēmai. Iespējams kādam citam noder.
Dārznieks, lol
Notikumi tā sakrita, ka iegādājāmies pāris jaunus telpaugus, jo iepriekšējie bija beiguši savu dzīvi (gadās). Apņēmības pilns, nolēmu tos šoreiz neaizmirst uz pus-gadu podiņos, paņēmu no plaukta arduino, iespraudu puķu podā pāris spailes un sāku veikt mērījumus (pretestību).

Teorētiski viss vienkārši - mitrums = maza pretestība; sausāks = lielāka. Nodomāju ka jāsāk ar empīrisko datu ielasīšanu, jānoliek to visu stacinoāri. Lai padarīto to visu mobīlāku, iegādājos TPLINK (MR3420 v1.2) bezvadu rūteri ar USB portu, arduno pievienošanai. Pirms iegādes noteikti jāizpēta, lai rūterim derētu openwrt vai ddwrt firmware.
#include "DHT.h"

#define DHTPIN 3

#define DHTTYPE DHT22

DHT dht(DHTPIN, DHTTYPE);

const int PROBE = A0-A4;

int powerPin = 2;

void setup() {

  pinMode(powerPin, OUTPUT);

}

void loop() {

  Serial.begin(9600);

  dht.begin();

  digitalWrite(powerPin, HIGH);

  delay(100);

  // Reading temperature or humidity takes about 250 milliseconds!

  // Sensor readings may also be up to 2 seconds 'old' (its a very slow sensor)

  float h = dht.readHumidity();

  float t = dht.readTemperature();

  // check if returns are valid, if they are NaN (not a number) then something went wrong!

  if (isnan(t) || isnan(h)) {

    Serial.print("0,0,");

  } else {

    Serial.print(h);

    Serial.print(",");

    Serial.print(t);

    Serial.print(",");

  }

  Serial.println(analogRead(A0));

  digitalWrite(powerPin, LOW);

  Serial.end();

  delay(5000);

}
Procesā piepirku klāt arī vienu mazu sensoru temperatūras un gaisa mitruma līmeņa mērīšanai. Interesants modulis, DHT22. Ja mērījumus veic nepārtaukti, notiek neliels, bet pastāvīgs elektrolīzes process. Lai to novērstu, ķēdē ievietoju tranzistoru un no atsevišķas datu izejas to ieslēdzu pirms datu ieguves tikai noteiktos intervālos.
Papildus labojums - ja seriālo portu never katru reizi ciet (Serial.end()), tad savienojums pēc kāda laika taimautojas un attiecīgi datus vairs nesūta.

Pirmie grafošanas mēģinājumi tika veikti uz rūtera, bet sarežģītākām kalkulācijām negribēju to pakļaut, tādēļ meklēju veidu kā datus sūtīt prom, glabāt internetā. Sākotnēji neizdevās atrast risinājumu, kurš ar visvienkāršāko GET pieprasījumu ļautu man tos saglabāt, tādēļ izveidoju savu, http://data.iists.it/ , kurš dara tieši to. Pāris dienas vēlāk, Gints bija atradis tādu cosm.com , kurš ļauj saglabāt datus un attēlo tos smukos grafikos. Nedaudz pa sarežģītu un datu iesūtīšana arī sarežģītāka kā es to gribētu. Tā nu uztaisīju ka tiek sūtīts uz abiem.
Novērojums tāds ka vēl aizvien sistēma mēdz nesūtīt, tas saistīts tieši ar rūteri, ar to ka tas ieslēgts Wifi klienta režīmā un mēdz nepieslēgties pa jaunu pie centrālā rūtera kad tas tiek pārstartēts vai kas tamlīdzīgs. Iespējams, jāievieš lokāls datu buferis rūterī, gadījumos kad nav interneta savienojuma. No tiem datiem kas ir arī šķiet, ka nepieciešama vēl viena pretestība, precīzāka intervāla attēlojumam.
Tālākie plāni ir ievērot konkrētus intervālus un kad mērījums sasniedz konkrētu robežu, ieslēgt notikumu, piemēram:
- sūtīt e-pastu (aplaisti mani ;( )
- ieslēgt mazu akvārija pumpi un pašam sevi apliet